Documenting the application in Mat|r
by Fer Ch.
As programmers, you know that documentation is vital in the life cycle of any application development. This is vital for the mat|r team as well. For this reason, the platform has a tool that allows you building documentation that support your applications and libraries.
Understanding the Documentation Editor
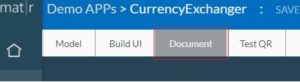
Accessing the editor is simple: just click on the tab “Document:”
Once inside, you can visualize the different fields to complete the documentation as well as a text editor to build the documentation body. Some of these fields are mandatory to save the application. Below, each of them will be described.
Parts of the Documentation Tool
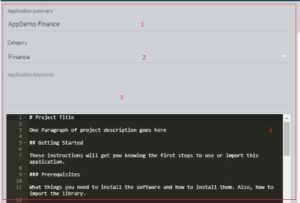
- Application Summary: Mandatory. Fill it in with a brief description summarizing thee application.
- Category: Mandatory. Fill it in with the category that suits the application.
- Application Keywords: Complete with different keywords to reference your application and ease its search in mat|r Hub.
- Editor Markdown: the main body of the application’s documentation can be built in this text editor. Use the markdown entities to change the format.
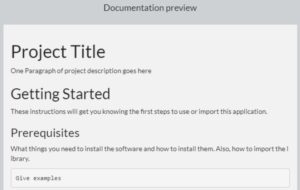
Así también cuenta con un panel de previsualización donde se podrá observar en todo momento lo escrito en el editor markdown, pero ya con los estilos y formatos aplicados.
Markdown
For those who do not know, Markdown is a lightweight markup language which converts plain text formatting syntax to HTML format. Said markup is no more than special characters or ‘text/character’ combinations that will provide the text its format when converting it to HTML.
By using these characters, the documentation format can be changed easily in mat|r.
Below, there is a list with all the kinds of markers supported by the mat|r documentation editor.
A continuación pueden ver una lista con todos los tipos de marcadores soportados por el editor de documentación de Mat|r:
- HeadLines
The HeadLines different sizes are represented with the following structures:
# Text
Text
==
For subtitles, more than one numeric character can be used in the first structure. It is also possible to use the character ‘ – ‘ (minus) instead of ‘ = ‘ (equal.) For instance, taking this into account, the visualization of each of the supported sizes would be the following:
# HeadLine 1
## HeadLine 2
### HeadLine 3
#### HeadLine 4
##### HeadLine 5
###### HeadLine 6
HeadLine =
==
HeadLine –
—
- Lists
Lists can be marked with different characters in mat|r’s markdown editor. These markers’ visualization will be the same as shown below:
+ Element
* Element
– Element
- Code block
Creating a code block in markdown is simple. Just start your line after four spaces (one tab) and it will be highlighted in light-blue. Next, bearing in mind the four spaces before each line, write the code needed by following the format below:
Code
block {
content…
.
.
}
- Links and images
The editor also allows including links and images in the document at the end of the project. For both cases, the structure to follow is similar.
-
- Links
First, between square brackets, write the literal expression that will be visualized in the documentation. This will work as link as well. After this, between brackets, write the full link followed by the ‘title’ of it, which will appear when moving the cursor over the link.
[enlace](https://link.com “título”)
-
- Images
The basic structure is very similar to the one of common links. The difference is that, at the beginning, an exclamation mark ‘ !’ must be written. The rest is the same, except for the functioning of the square brackets content, as the image will be visualized instead.

- Emphasis on the text
There are five marking types to provide three different types of emphasis to the text:
_Italic_
*Italic*
__Black__
**Black**
‘Code’
- Extras
In addition, the markdown editor allows drawing horizontal lines to organize the documentation. Draw it by typing three hyphens or asterisks.
***
We hope this tutorial is helpful. Do not miss our next post.
Visit our platform: platform.matrproject.com