Hello there! My name is Fernando and I am a mat|r specialist. This time, I have come to show you some things you can do with mat|r script. As an example, it will be explained how to develop the game of tic-tac-toe which allows two remote players. Having nothing else to say, let’s get to work! (Note: The goal of this post is to show how simple it is to achieve certain things. For more details, head to the complete code with comments at the end.)
First of all, let’s explain the game to remove any kind of doubts.
Tic-tac-toe (also known as noughts and crosses or Xs and Os) is a pretty simple game for two players who take turns to make moves in a 9 grids board. The goal is to place three marks in a horizontal, vertical, or diagonal row, before the opponent. The one who succeeds wins the game.
Having explained this, the basic structure of the game can be defined:
- 9 grids board
- Two players – each represented by a mark
- X
- O
Rules:
- Each player takes turns to place a mark on the board.
- The player who goes first is random.
- After each player’s third move, a victory could be scored.
- To analyze a victory, just look at the column and the row.
- If there are no winners by the 8th move, the game ends in a draw.
Keeping all this in mind, let’s develop the application.
First, there will appear a screen where each player will be able to enter their name before clicking on ‘Ready’ and waiting for their opponent, as displayed in the following screen shot.

To do so, a small experience must be created, just as shown below:
Experience Join {
//Local Player Nick
String nick label(‘Enter your Nick’) as TextField
//Checking of online players
Bool checkPlayer1 value(false)//Local
Bool checkPlayer2 value(false)
//Join
Decision joining action(‘InContext.join’) label(‘Ready!’)
//Labels
String readyPlayer1 value(‘Ready!’) as Label
String readyPlayer2 value(‘Ready opponent’) as Label
}
As you can see, it is enough to define those components shown in the example image in a simple way within the experience. By doing so, the binding between each UI component and the attributes of the experience is ready.
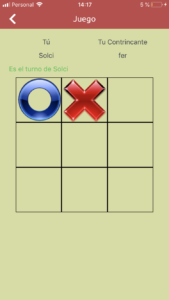
Once both players are ready, the next screen will display the game board. A similar screen to the one shown below will be created. To do so, the following code must be written to define the experience:
Experience Game {
//Players
String player1 value(‘Player 1’) as Label
String player2 value(‘Player 2’) as Label
//Current turn
Integer turn value(-1)
String turnS as Label
//Squares of the board
String s00 value(”) as Image
String s01 value(”) as Image
String s02 value(”) as Image
String s10 value(”) as Image
String s11 value(”) as Image
String s12 value(”) as Image
String s20 value(”) as Image
String s21 value(”) as Image
String s22 value(”) as Image
//Amount of moves and results
Integer moves value(0)
Bool winner value(false)
String winerS value(”)
//Logic board
Array<Array<Integer>> chips value([[0,0,0],[0,0,0],[0,0,0]])
//Last move
Integer row value(-1)
Integer column value(-1)
//Labels
String you value(‘You’)
String opponent value(‘Opponent’)
}
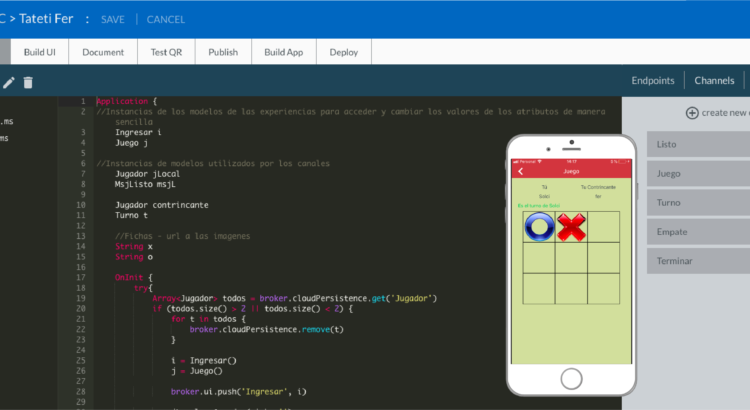
After defining these few components, the tic-tac-toe board can be built easily and quickly. As you can see, the way the players interact with the board in this case is by means of images events which are binded to the strings called c00, c01, etc. Later, it will be explained in detail how to implement such events.
Implementing ASYNC
Now that both screens are appropriately built and their UI is ready to be edited, it has to be considered how the players will communicate while playing from totally different devices. In order to achieve this, a new mat|r function will come in handy: ASYNC.
ASYNC allows us to register a device in a channel to enable it to receive messages from all devices that send messages to such channel. Said messages are just mat|r models. For this reason, in case it is necessary to send, for instance, one of the players’ username, defining a model in the application which has a String is enough. The username will be stored in such String. After that, an instance of that model must be created. It is also required to assign the name that the user enters to the String. Then, the instance shall be sent to the channel in order to allow the other listening devices to receive the model with the name instantly.
But this is not all. In order to subscribe a mat|r application to a channel, it is first needed to define a function which will be the callback of such channel. This means that it will be executed every time a message coming from that channel is received. This makes the messaging reception process easier thanks to ASYNC.
After this explanation, the potential of ASYNC can be seen. For this example application, ASYNC will not only be used to send and receive the players’ names, but also, taking it a little further, to send each players’ game and to update the boards whenever they make a move. It may sound complex, but it is pretty simple.
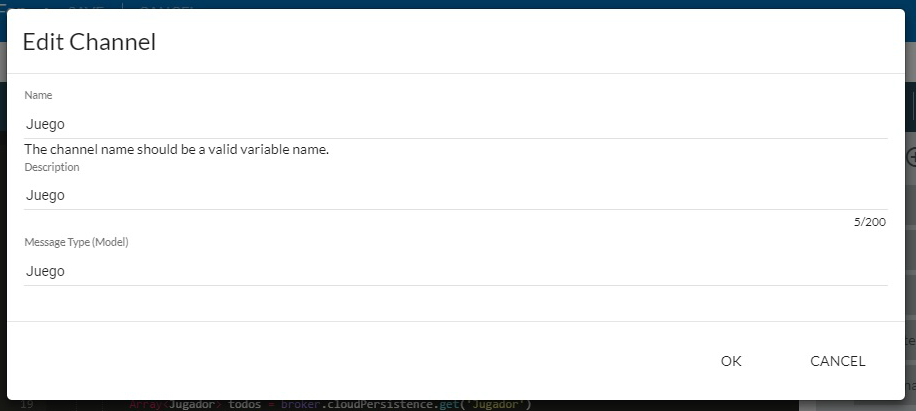
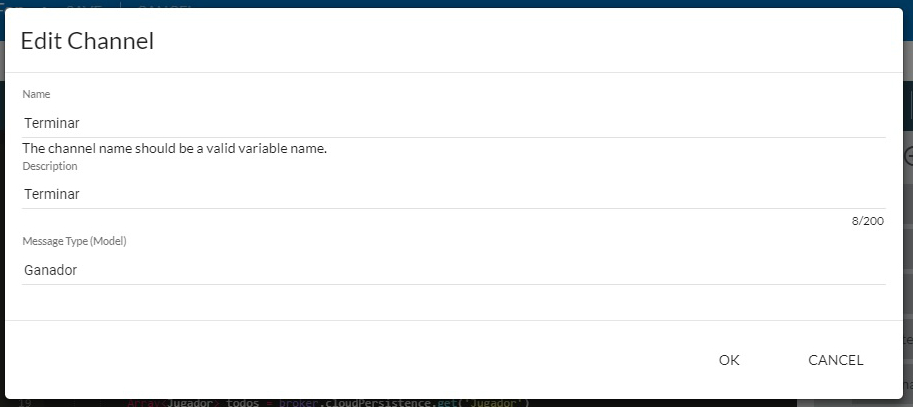
First thing to do is creating the channels. To do so, the channels abm tool, which is available in the platform Modelller, will assist our task. Each channel requires a model that will be the message to be sent through it. For this reason, the following models are defined:
Model ReadyMessage {
//To check of local publish
String nick
}
Model Turn {
//Counter of turn
Integer number
}
Model Winner {
String nick
}
Model Tie {
String tie
}
Once the models have been defined, the only thing left to do is creating the channels. To do so, click on the ‘Channels’ tab located on the left. Next, click on ‘create new channel’. Below, there are some images for you to check each of the channels configurations.
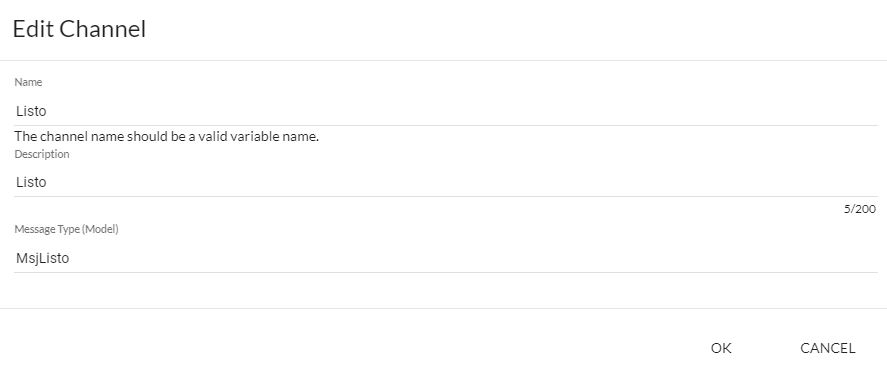
This channel will be used to send notifications between the players when they are ready. Because of this, the notice will be sent whenever any of the players hits the ‘Ready’ bottom on the first screen.
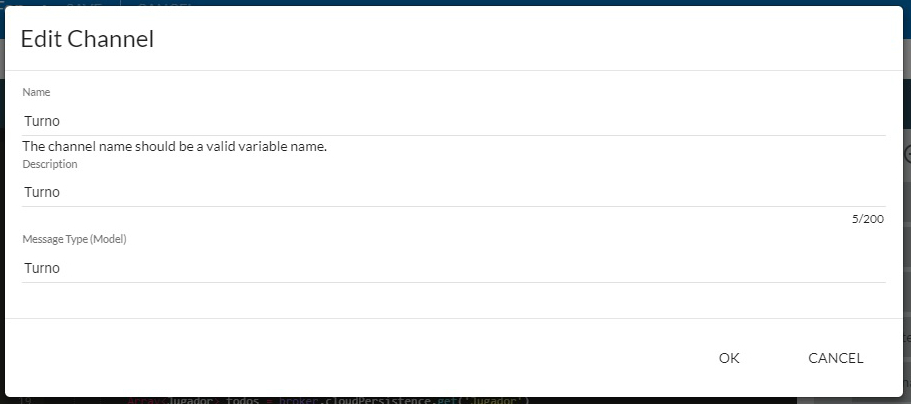
These two channels will help us to send the information of each of the players moves from one end to the other. When a player places a mark on the board (O – X), the first thing to do is sending the game information. This will upload the board of the other player. Then, the other channel will give notice to both about the turn change in order to be simultaneous and to stop the player who already made a move from doing it again.
Finally, after each move, it will be checked if it is a winning game. For this, the ‘magic square’ method will be used (for more details, look at the code.) After checking if the last game is a winning one, it is published in the ‘Finish’ channel to inform both players about the result. In case there are no winners and the maximum limit of moves has been reached, the game ends in a draw. In both scenarios, the board will be cleared and set for another round after notifying both players about the results.
Rules of the game
To finish, let’s go back to the board screen where the events for each square will be defined. To do so, establish a rule for each square where the move will be made. The message will be published in the ‘Game’ channel. Take a look at the rule corresponding to the 0 – 0 square:
Rule r00 {
if (game.turn == playerLocal.number && game.s00 == ”) {
if (game.turn == 2) {
//If the Player 2 is playing, we mark with “O”, then we increase the number of moves and upgrade the “logic” board.
game.s00 = o
game.moves = game.moves + 1
game.chips.get(0).set(0, game.turn)
// We save the last move to do controls.
game.row = 0
game.column = 0
//publish game – We send the information of the board.
broker.async.publish(‘Game’, game)
turn.number = game.turn
//publish turn – We send the notification of the turn change.
broker.async.publish(‘Turn’, turn)
} else {
//The Player 1 is playing, we mark with “X”, then we increase the number of moves and upgrade the “logic” board.
game.s00 = x
game.moves = j.jugadas + 1
game.chips.get(0).set(0, game.turn)
game.row = 0
game.column = 0
//publish game
broker.async.publish(‘Game’, game)
turn.number = game.turn
//publish turn
broker.async.publish(‘Turn’, turn)
}
}
}
By applying this, the tic-tac-toe app is almost ready! The only thing left to do is to complete some execution parameters that can be found in the full code and to implement the graphical interface.
For the moment, find the simple interface shown before. In later publications, our code will be improved and a game with the mat|r UI editor will be played. I will show you how to create and implement a more professional UI for your applications and not to die trying.
.
The following link will take to the page of this application’s hub. You can find the full code here: https://platform.matrproject.com/hub/view/5b59cbd6f7d2e900112f8072 . This is all for now. Stay tuned for more updates on the blog! There are plenty posts to come!
Until next post!